Category Archives: electronics

non-reversible reverse engineering of an electric toothbrush

i always wanted to study how the inductive charging in such devices actually works and i decided to open an old braun tooth brush to study it.

here’s two gifs:

toothbrush standing

toothbrush


you can open the toothbrush by destroying the snap-ins underneath the plastic protection:

20170121_114136

20170121_122345


this is the final charging setup, in the end it didn’t work anymore, the battery is probably dead, i may connect a standard 1.2V NIMH battery to it and see what it does. the multimeter showed about 300mV on the receiving coil which seems a bit too low to me but that might also mean that the battery is dead?

20170121_170341

here’s the chips, if anyone’s interested:

20170121_171047

Arduino Tamagotchi, first power up!

That was more intense and exciting than I anticipated! I thought building my first “homebrew Arduino”  from an atmega 328p and controlling an OLED via I2C shouldn’t be too complicated.

In fact, it isn’t, but there are a couple of things you have to think of, especially when you do it in this contrained space.

20161204_173740sAnd actually, you can see the wiring mistake I did up there, I connected the RST of the chip and the DTR of the FTDI port wrong. But chip, FTDI and capacitor survived it…

I also did the buttons wrong as the buttons were rotated and always ON / HIGH. So, I changed the layout from this:20161204_183737s

To this:20161211_212541So now the power is on the upper part of the buttons, instead of the right (for the left buttons).

Yeah, so finally, here’s the first power up! The date / time is wrong because the third perf board with the RTC and the speaker are not connected yet, so the clock starts when the atmega is powering up:


68k homebrew computer – parts list

For building my own version of an 68000 based computer (actually, it’s the 68008, i.e. 8bit version) I recently, ordered all parts that are described in the 68k blog, here is a list together with the prices that I paid at Digi-Key. The package to about 10 days from the US.

Here’s a video walk through, followed by the list and data sheets of the chips:

all other chips for the 68k computer

all other chips for the 68k computer

Here’s the list of glue chips, together with their function and respective datasheets as links:

SN74LS244N: OCTAL BUFFERS AND LINE DRIVERS WITH 3-STATE OUTPUTS

SN74LS32N: quadruple OR gate

SN74LS08N: quadruple AND gate

SN74LS377N: flip-flops

SN74LS139: demultiplexer for deciding whether to access flash, RAM or serial.

SN74LS00N: NAND gates

More complex chips:

AS6C4008: 4MBIT RAM

SST39SF040: 4MBIT Flash ROM

ATF22V10C: GAL chip (programmable logic)

The USB host chip referred in the video is here, there is also shields for Arduino.

After posting this on Reddit, there was a great discussion on how to reduce the chip count. Some suggested that I could reduce the complexity by using the address lines in a clever way, i.e. using one pin to enable RAM access, one to enable flash access and one for the serial connector. I’d LOVE to try that out. Should I dare?


back to my computational teenage: building a 68000 homebrew computer

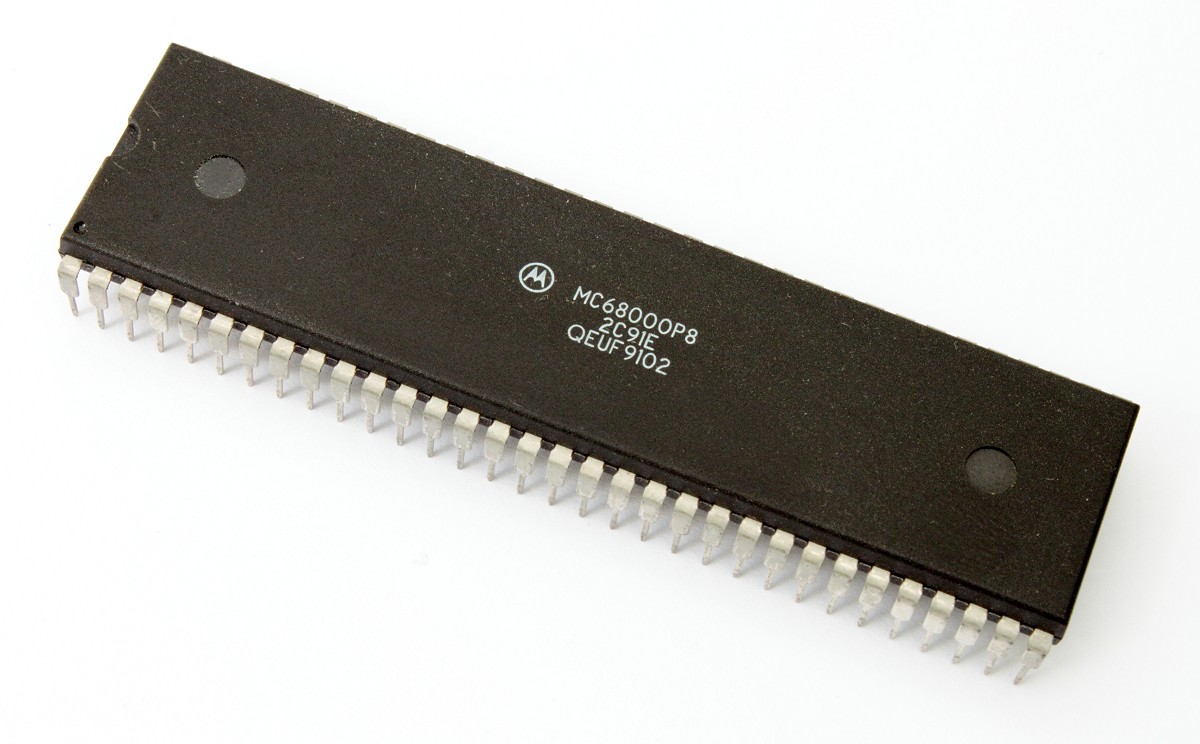
68000 chip (courtesy of CBM Museum)

after my first commodore c64, i was so much in love with the amiga and it took quite some time until i had my first amiga 500 in my hands. i still remember the smell of the package and the computer. the first boot up of the workbench, the mouse et cetera. a wonderful feeling. it was the computer i learned to program c on, after i had upgraded my basic from the c64 to amiga basic. i was fascinated by this computer, its graphics capabilities and the unbelievable amount of 512kb ram. after working with “atzec c“, upgrading to 1mb ram and having a ram disk to not always change the floppy disk all the time. i had the feeling that i needed to learn assembler.

at that time i was writing 3d routines, i wanted to design my own flight simulator. and assembler was a wonderful way of learning the aesthetics of minimality. having a table of clock cycles per command next to your computer and refining algorithms to run ever faster was a great joy.

later in my life i came across minix, the microkernel architecture of a unix derivate and “the father” or at least inspiration for linux. again, i loved the simplicity of everything. the beauty of “processes vs data, input vs output” and the beauty of microkernels. i never actually did anything with minix, but now that i own the whole family of raspberry pis i’m truly tempted to give it a go.

so, here we are: the combination of the two would be a great thing: bring 68000 back into my life and have minix running on it. fortunately, people have ported minix to the 68000, so i hope that this adventure will not leave me dead in the desert (since the ports are usually for macs or atari st).

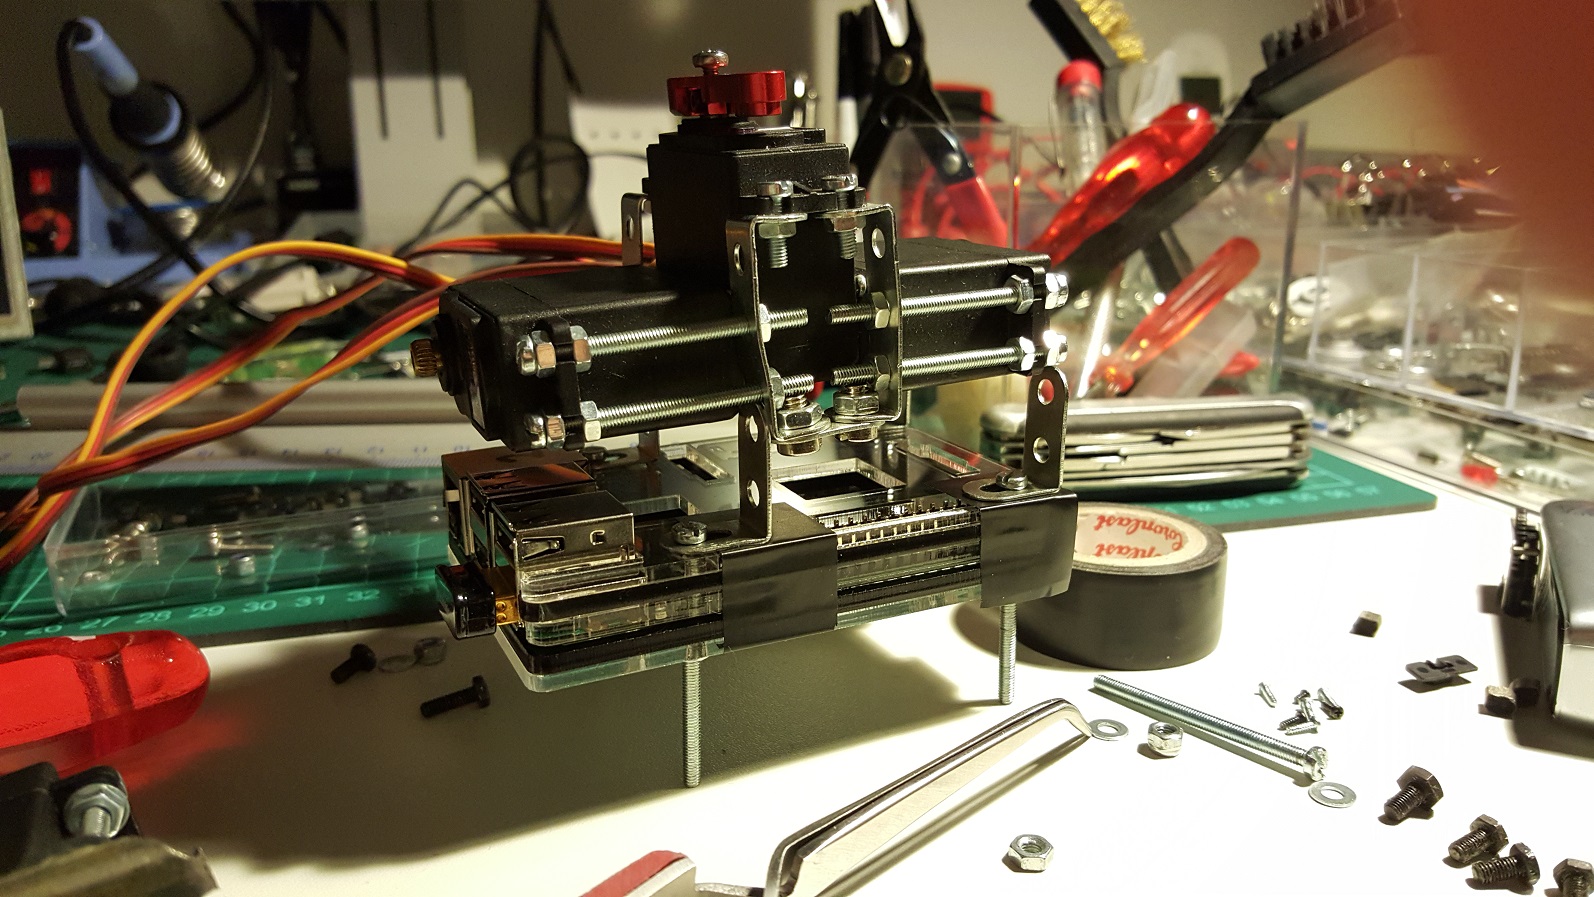
searching the web for crazy people who’ve built a 68000 homebrew computer, i immediately was inspired by 64 Katy, since this seems a simplified computer enough for me. this guy managed it to build one on a BREADBOARD! later on, he built a new version using an fpga (if i understand correctly, a cpld is an fpga) for the glue logic and an etched board. this is too far away for me, but i’d love to build one using perfboards and ic sockets.

possibly, i could then increase its clock rate from the breadboard 2mhz to maybe four or six.

i love katy’s architecture because it does a minimalistic approach, reduces all parts needed and i hope to understand how these parts work all together. especially i’m interested to learn what you need beyond cpu, ram and rom to get a system going (there’s obviously all these 74er series going on that do the glue magic). moreover, i’m happy that the guy was not over-engineering the “surroundings” like graphics, sound, keyboard etc (there’s another guy who did that) but really relies on the serial connection for input and output.

so, the initial step would really be to build the 68008 version with 512k ram and 512k flash and get the monitor programm running.

i already enjoy flipping through these two books:

20161020_192224

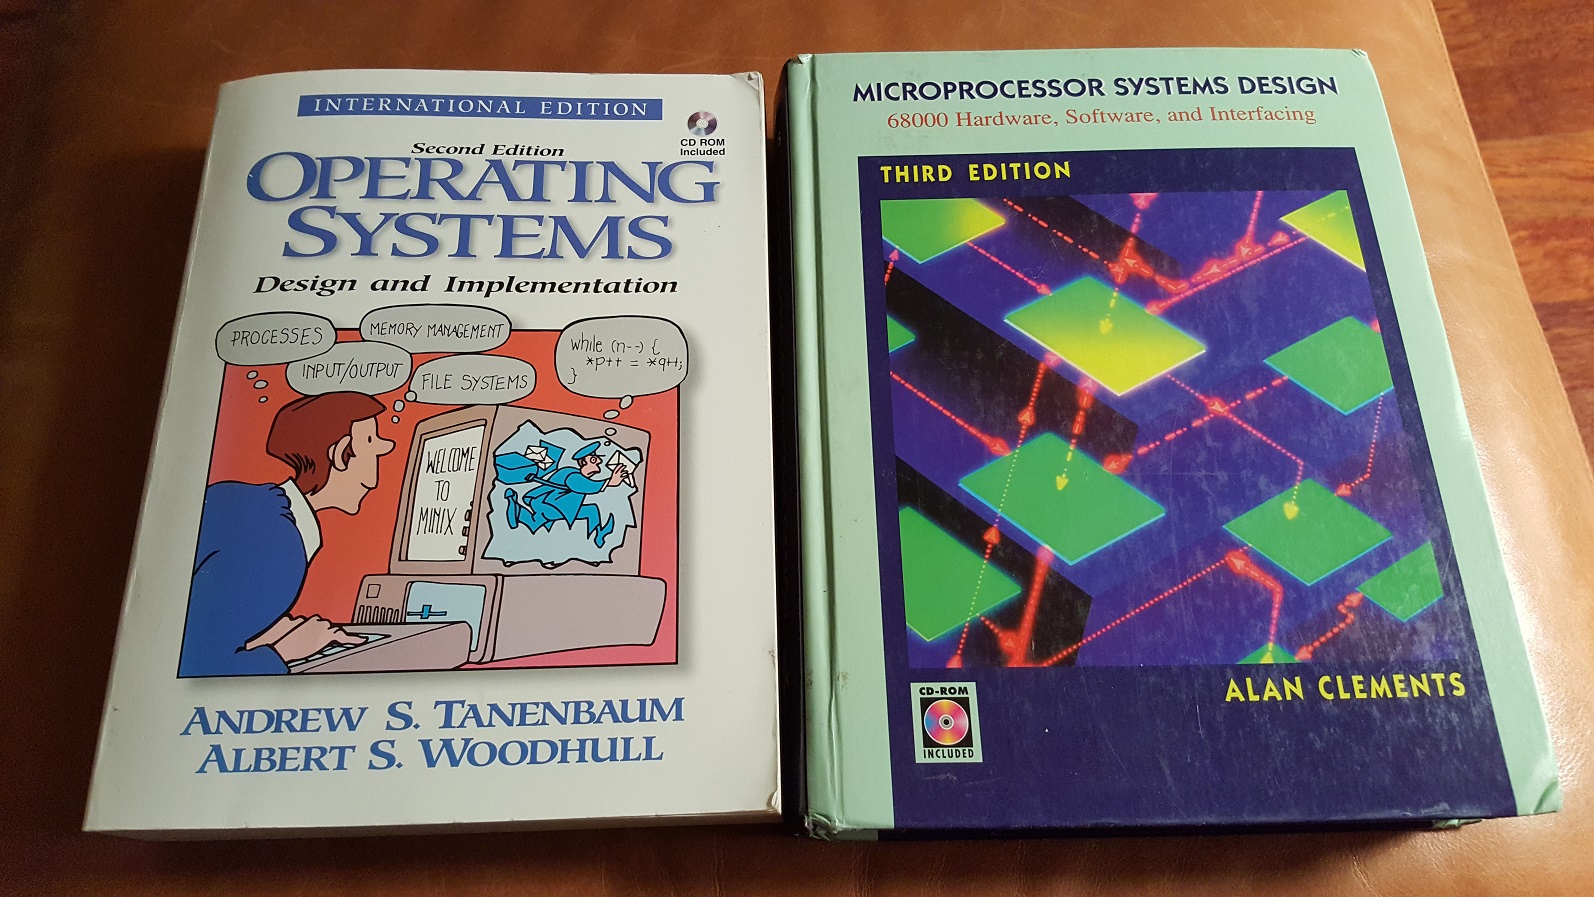
the 68k book also describes a single board computer, but that is also based on the 68000 chip which has the 16bit bus and thus would be a huge effort to build compared to the 68008 that is 8 bit.

people in the internet also refer to this book that obviously also describes another design.

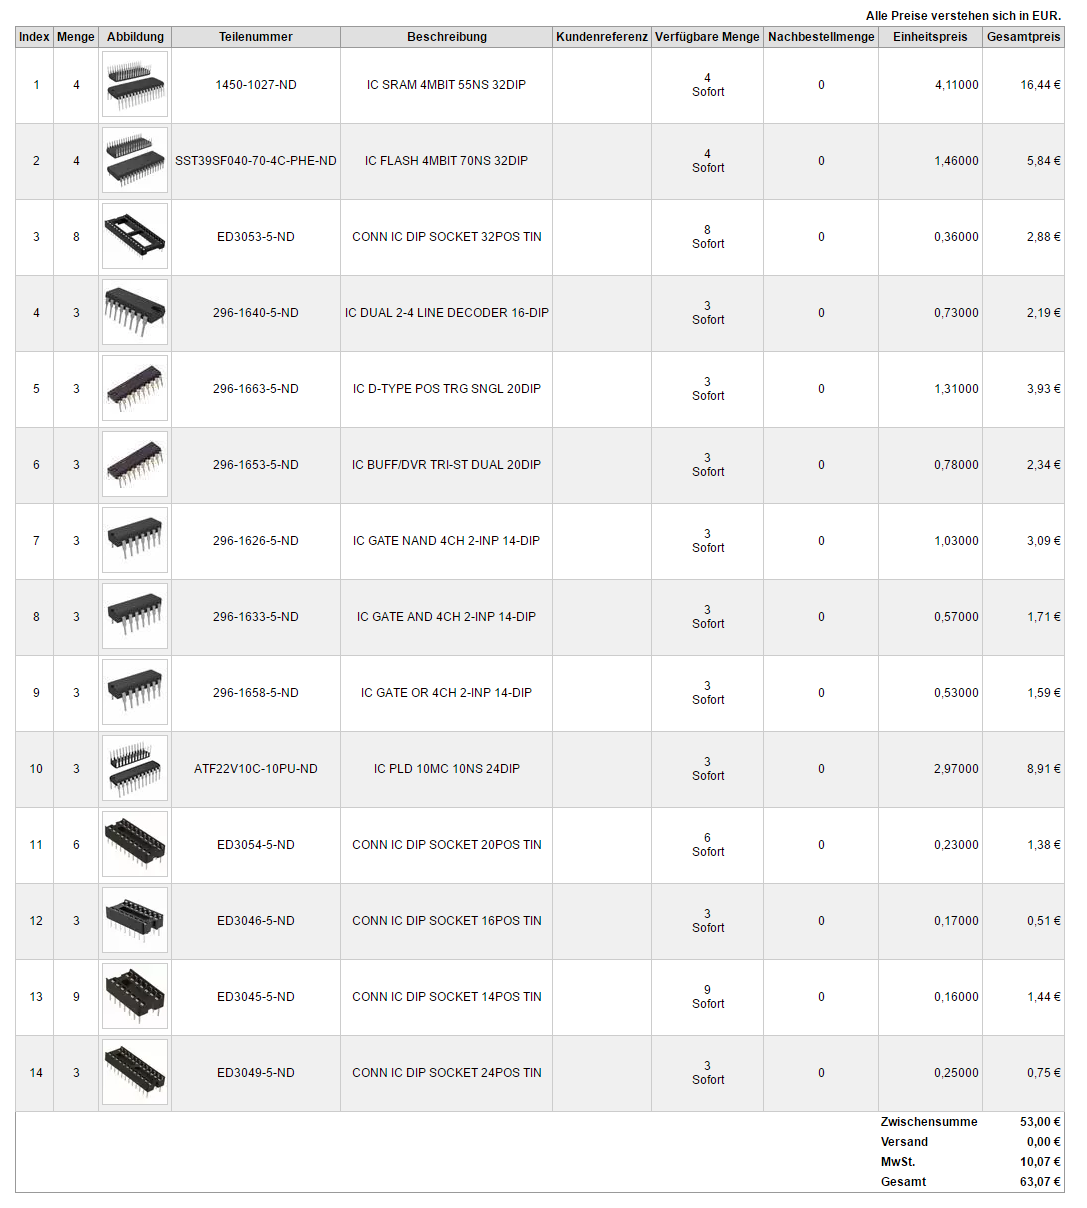
interestingly, cpu, ram and flash cost about 12 euro altogether which is way less than the books :-D.


first “unit test” in programming an arduino mini pro

so, after i’ve connected the head and its servos to trashbot 6, it’s now time to work on the actual control of the neck servos. unfortunately, the servo-board connected to the raspberry is not sufficient to control the neck servos since the body is already using 15 servos and the controller only has space for 16.

so i thought to use an arduino mini pro for this since it has 6 PWM outputs that can control six servos (people have noted that the output pin doesn’t necessarily have to be capable of PWM to control a servo). Continue reading

deconstructing the minoru 3d stereo webcam

i’m thinking about adding stereo vision to trashbot as the raspberry pi has enough oomph to do some kind of computer vision and it seems that open cv supports this camera.

there’s not too many “3d” cams out there that actually fullfill my requirements:

  • cheap (<100€), so i can buy more when killing one
  • 3d or at least two cameras
  • strippable
  • supported by raspbian et al.
  • small enough to fit a robot’s head and
  • light (as the higher up the hardware in the bot the more it will impact stability when walking)

Continue reading

my first self-made usb plug

for trashbot 6 i planned to change the arduino nano into a raspberry pi 2. i also moved the board below the hips as luckily, the three mgr 996 servos of the hip are as wide as the raspberry pi:

raspberry pi 2 and the hip servos

but as you can see on the lower left (where the edimax wifi plug is inserted), the usb ports are pretty much flush with the outer servos, i.e. the attached legs will not leave too much space for usb plugs. Continue reading

trashbot 6, quick video walk through

most of this work has been done over christmas, but only now i found the time to at least do a quick tour around the bot. here are some highlights:

  • arduino nano changed to raspberry pi 2 & wifi
  • moved controller from back to hips
  • added 16 channel i2c servo controller
  • new foot construction adding an additional degree of freedom (DoF)
  • reconstructed legs that are lighter and now take up new batteries
  • power distribution board including i2c current / voltage measurement
  • accelerometer and gyro sensor (i2c) moved to “belly” instead of neck
  • added arms with shoulders (two DoF)
  • changed spine, reduced complexity
  • removed head for now (being redesigned)

slaughtering external USB batteries to keep robots alive

current discussions are revolving around when and not whether ai will supercede us human beings. i learned the following lesson: we need to slaughter for them first! it’s about batteries, power!

after my last research on different options to power the raspberry pi, i wanted to invest some time into the external usb batteries that power our phones when we’re out and about.

it’s actually hard to find people who have invested time to decompose such devices but i actually think, it’s worthwhile because you learn a lot. so in this case i invested some time into two batteries to learn how easy / complicated it is to get to the innards: a little 2600mAh battery and a 4000mAh battery both i received as gifts on conventions (thanks techniker krankenkasse and telefonica germany!)

i haven’t documented the blood, sweat and tears process when applying both smart and raw power to the devices, but the 2600mAh by the techniker krankenkasse seems to be a first generation of the anker device i found on amazon.  the second one was really a b*tch. here is the end result:

usb battery power supplies slaughtered

one the left is what i really love mechanically, you just unscrew the cap and get the innards out. SO NICE! however, Continue reading

Smart powering the Raspberry Pi using batteries

I’m looking for options how to power the Raspberry Pi using batteries for my Babble Pi project. Actually, it seems that it’s not as simple as I thought to find something and many solutions are also pretty extensive for their feature sets. I’m looking for a couple of features:

  • power the Pi from battery
  • charge the battery
  • shutdown when the battery is low
  • in order to do this, monitor the battery and ideally access the data using Python
  • ideally power up the Pi using the solution (it’s a pain in the butt that you can power down the Pi but now up)
  • possibly power it up using a RTC (real time clock)

I’m not really happy with all the external batteries for smartphones. They certainly can be charged and also deliver constant voltage for the Pi, but they are usually in some enclosures and they don’t communicate.

I haven’t found any extensive list of solutions out there so I researched one myself, additions VERY welcome!

https://pi.gate.ac.uk/pages/mopi.html
DC/DC converter (TPS5430 or TPS5430) with the ability monitor the voltage level via I2C and a python lib. It also has a shut-down button and can power up the Pi with the same button. You can add two batteries for hot swap or even a battery and a solar cell. It won’t charge the batteries, though. Price 35.50€

http://www.piups.net/
Can control and monitor voltage. Seems more like a UPS, not so much the concept of powering the Pi via battery (i.e. battery kicks in whenever the primary power source fails), but I’m not sure as they are not talking about the primary source. Furthermore, it can also charge batteries, but it can’t power up the Pi. It uses I2C for communication like the MoPi. Price: 29.99€

https://www.adafruit.com/products/1944
adafruit power converter is boosting your 3.7V lipo to 5.2V using a TPS61090 boost converter from TI. It also can charge your lipo which is very nice, however no level monitor and no power options for switching on/off your Pi. Price for 500mA: 13.37 Euro

https://www.adafruit.com/products/2465
PowerBoost 1000C can charge your battery while powering your Pi, pretty cool. The 500C can’t charge while powering, as far as I understand. Price for 1000mA: 17.84 Euro

https://www.piborg.org/battborg
DC/DC converter based on OKI78SR that turns many power sources to 5V. It’s not charging the battery and can’t monitor the voltage level. Also, it can’t shutdown the Pi. Pretty expensive for the features, esp when you consider the next solution. Price: 20.65€

http://hobbyking.com/hobbyking/store/__54275__HobbyKing_8482_Micro_UBEC_3A_5v.html
A battery is loosing voltage when powering a computer. However, the Pi has a quite limited range of voltage (4.75V and 5.25V) where it runs stable compared to Arduinos (7-12V). A simple UBEC (Universal Battery Elimination Circuit) I also use for my Arduino projects to power my servos with constant voltage. Simply constant voltage, nothing else. Price: 3.28€

https://www.adafruit.com/products/904
Using the INA219 current monitor, you can monitor your voltage via I2C on the Pi. No charging, no power supply, but possibly in combination with the UBEC from hobby king above at least the Pi can know when the battery’s gonna be empty and power down gracefully. Or I could imagine that you hook it up the PowerBoost charger to have charging, powering and monitoring. Finally, we’d need powering up again. Price: 8.90 Euro

https://www.kickstarter.com/projects/shahiddarbar/raspberry-pi-case-with-real-time-clock-battery-and
This is an unsuccessful Kickstarter campain that wanted to combine UPS, a real time clock and monitoring. I’m not sure it would also allow for charging the battery.


In sum, I think, there is still not the perfect solution out there, I like the simple UBEC in conjunction with other parts so I can build the perfect system myself, possibly also the PiUPS (which doesn’t really seem to be a UPS but really an intelligent battery solution).

Any systems I forgot? Any other features you’re dreaming of?